Engineering note
BloomRender User Manual: From Text-to-Image to ID Photos, Portraits, Travel Photos, and Virtual Try-Ons

BloomRender is a professional AI-driven photo editing and generation studio that uses the Google Gemini API to provide retouching, filters, ID photos, portraits, travel photos, themed photography, couple/group photos, and AI virtual try-ons. The following explains the operational workflows by functional modules, supplemented with screenshots from the project; all images are from the BloomRender Project.
1. Text-to-Image: From Text Descriptions to Concept Art
1.1 Entering Prompts
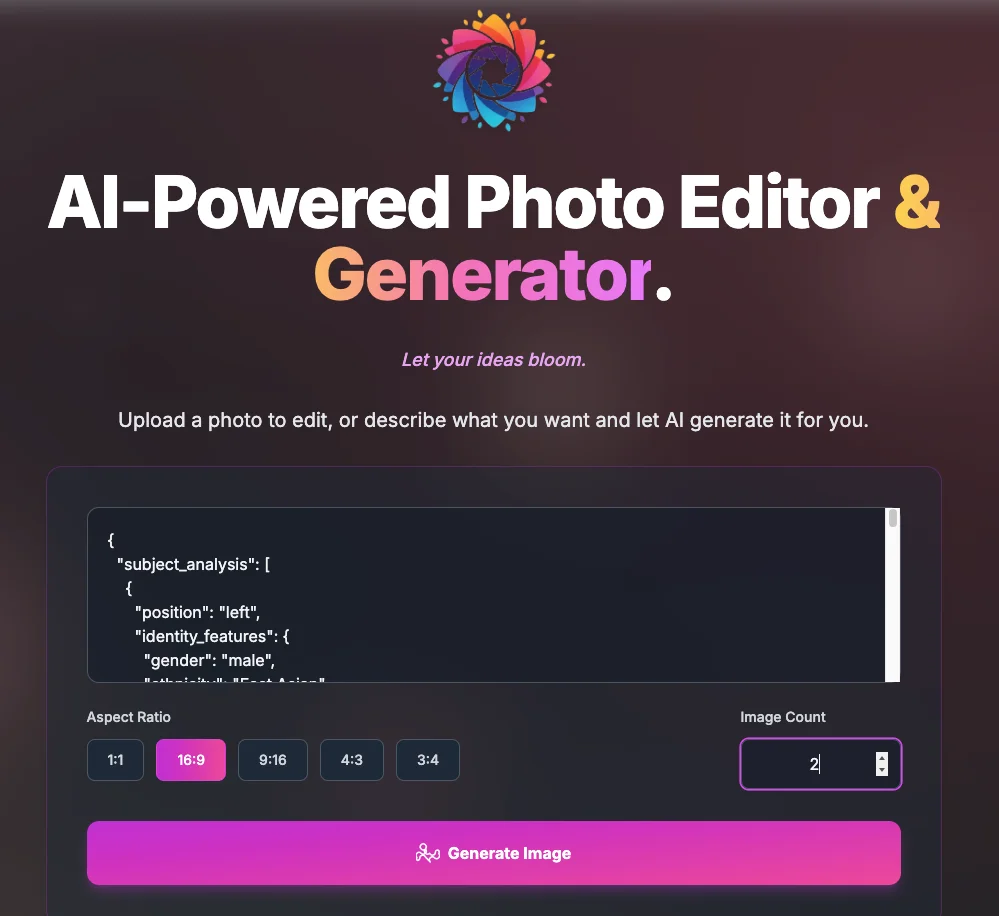
- Go to the “Generate Image” tab at the top of the homepage.
- Enter the scene you want to create in the “Describe the image you want to create” text box, for example:
- “Clean white background half-body portrait, suitable for resume use”
- “Office background, natural light, smiling expression”
- Below, you can adjust:
- Aspect Ratio: 1:1, 4:3, 3:4, 16:9, 9:16
- Image Count: Generate 1 to 4 images at a time.
If you need precise control over character features, clothing, and scenes, you can refer to the JSON structured prompt examples (gender, age, hairstyle, clothing, lighting, composition, etc.) in the project’s user manual. The complete JSON will not be detailed here.
Recommendation: Start with a looser description to generate a set of concept images, confirm the style, and then use the ID photo tool or editor for refining.
1.2 Browsing the Generated Results
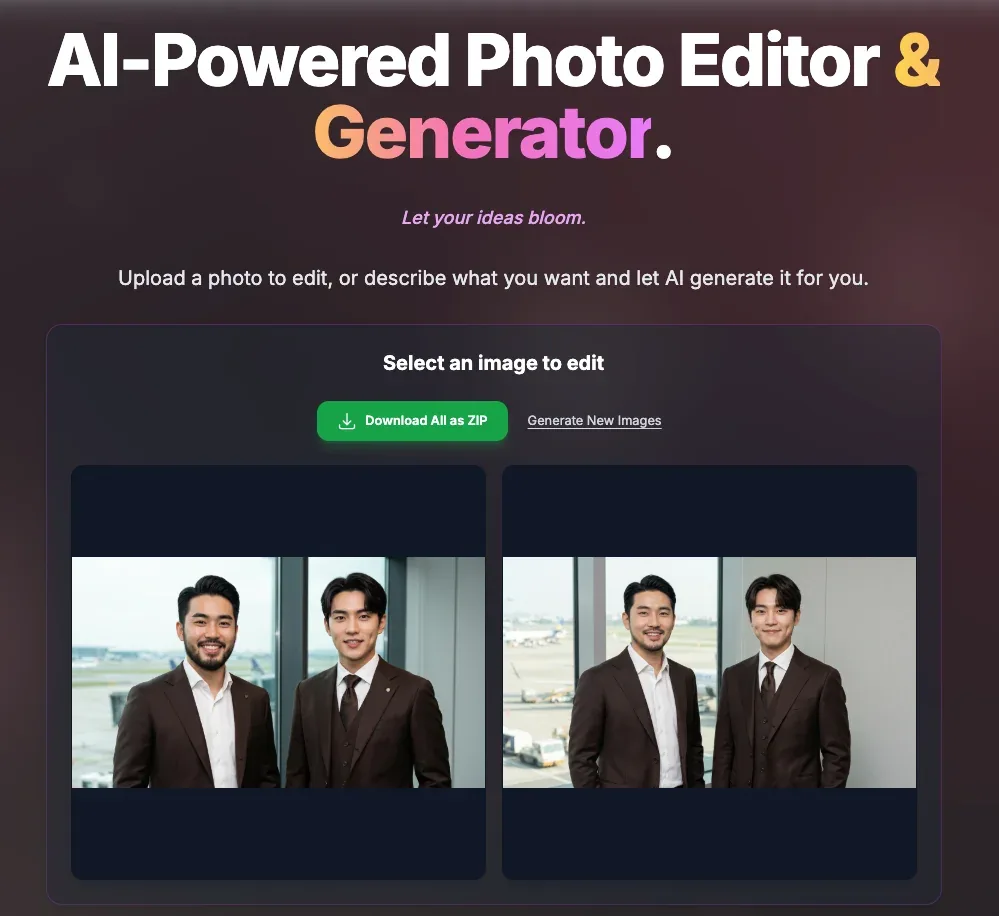
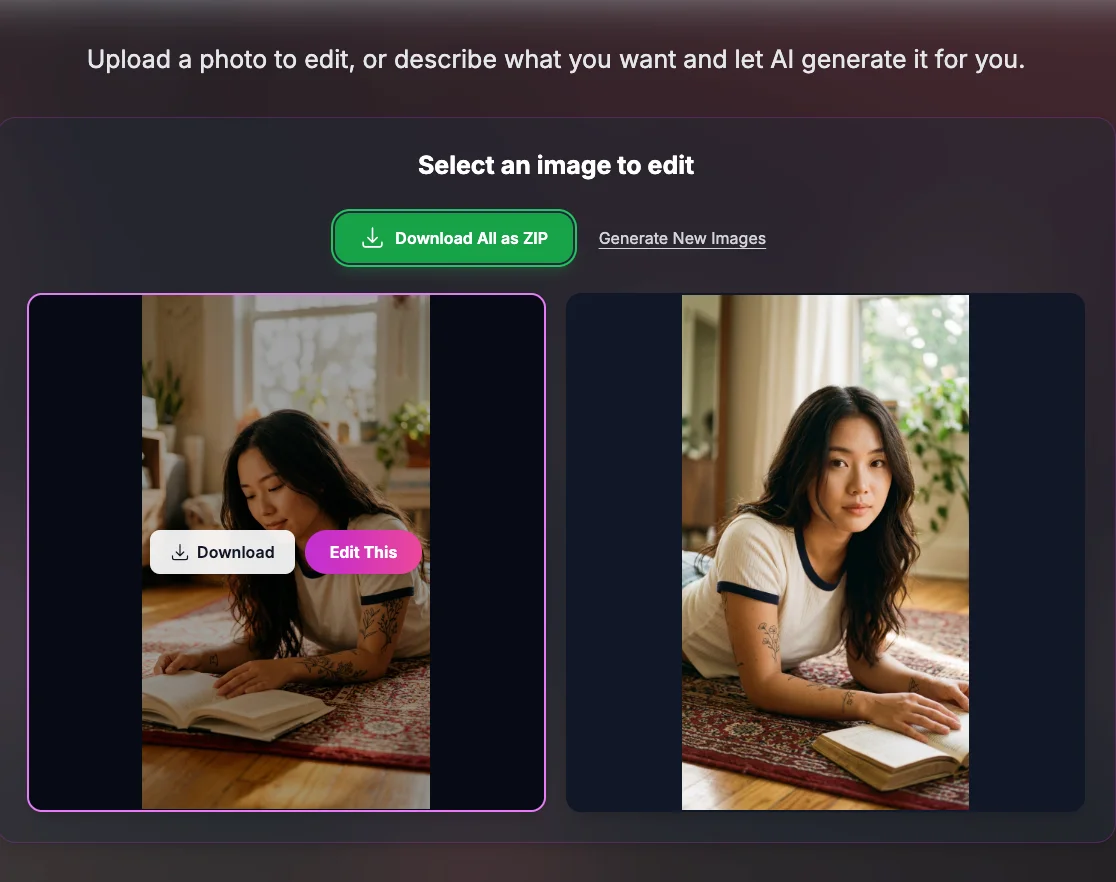
- Once generation is complete, the interface will display a set of thumbnail cards:
- Each image can be Downloaded (download single PNG) or Edit This (send this image to the main editor for detailed retouching).
- If multiple images are generated at once, a Download All as ZIP option will appear at the top, allowing you to batch download all results.
- If you want to try different styles: Click “Generate New Images” to clear the current results, re-enter prompts, and generate again.
2. AI ID Photo: From Messy Selfies to Formal ID Photos
This section demonstrates how to turn a “messy background, poorly composed selfie” into a clean, standard-compliant ID photo.
2.1 Prepare an Everyday Photo
- A solo everyday photo (can be a selfie or lifestyle photo):
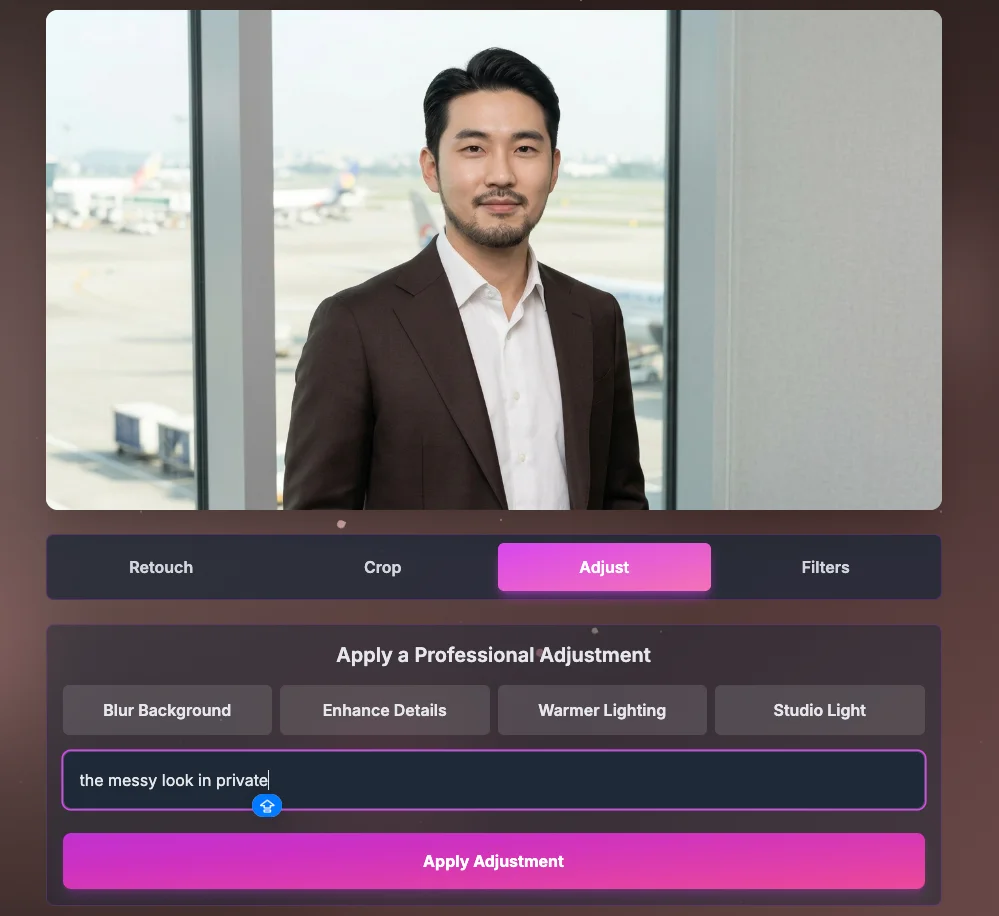
- A casual solo photo can also be used as input:
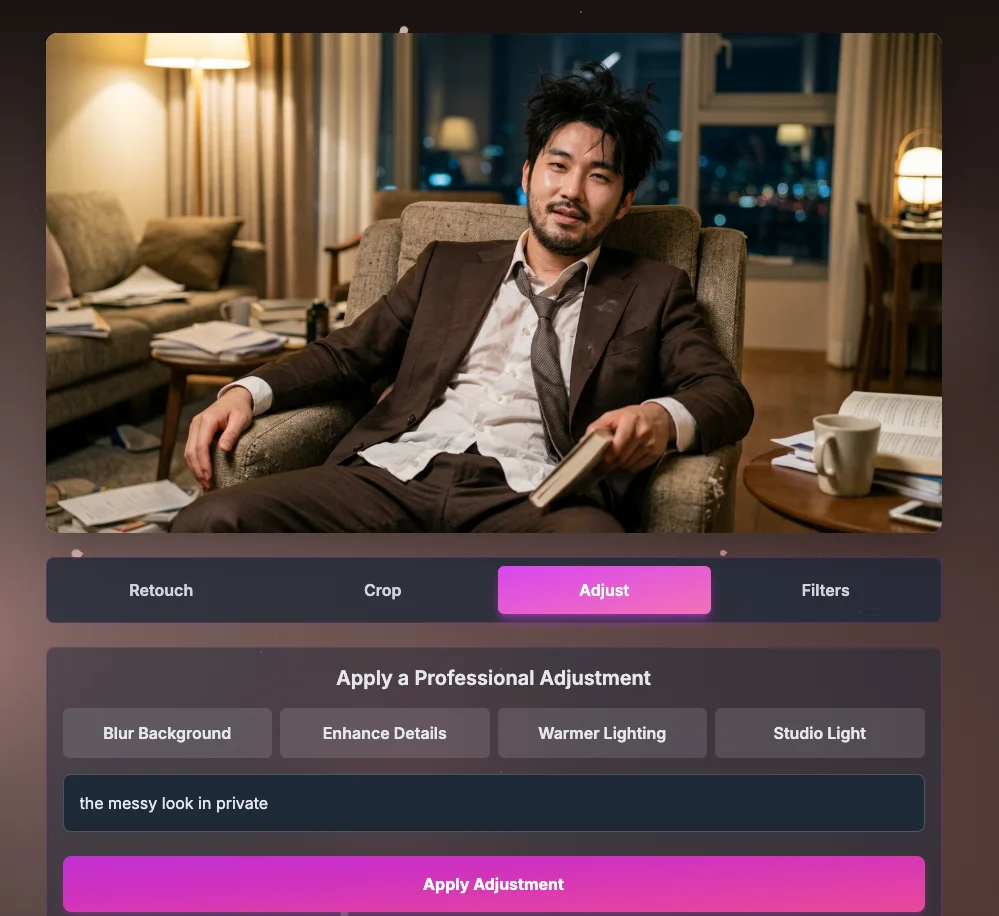
2.2 Fill Out the Spec Form
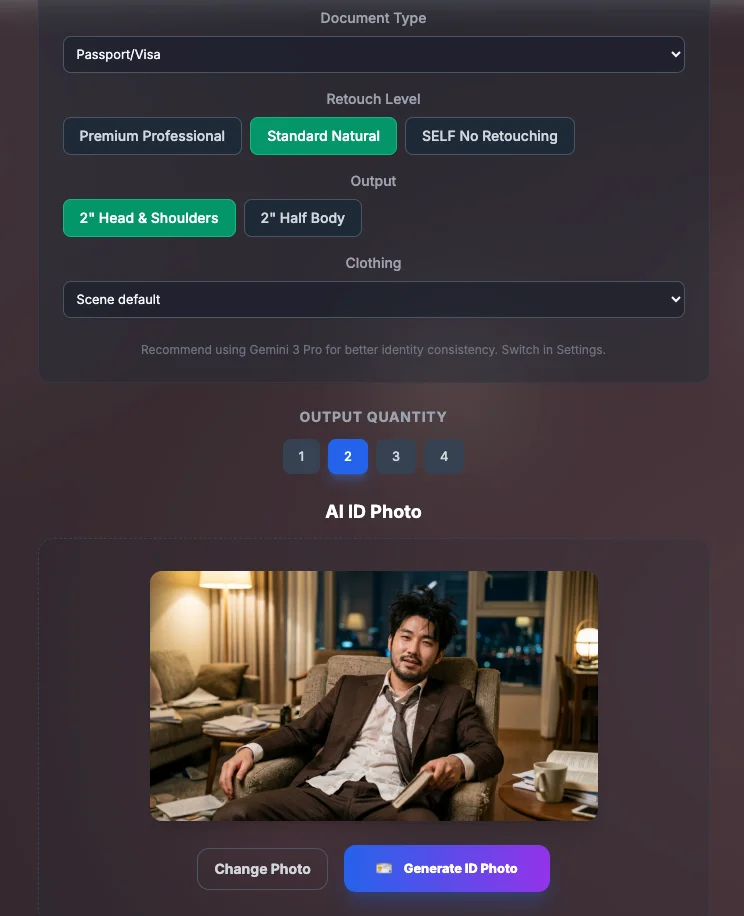
Configure in the IdPhotoForm:
- ID Type: Select the actual ID specification you want to use (e.g., Taiwan ID, US Visa, resume photo).
- Retouch Level: Choose “Natural” or “Moderate Beautification” to avoid over-editing.
- Output Specification: Select the officially recommended size (e.g., 2×2 inch, 35×45 mm).
- Clothing: You can choose to automatically apply a suit/shirt or upload your own clothing reference photo.
There will be hint texts next to the form explaining which fields are most relevant to official specifications.
2.3 ID Photo Field Menu
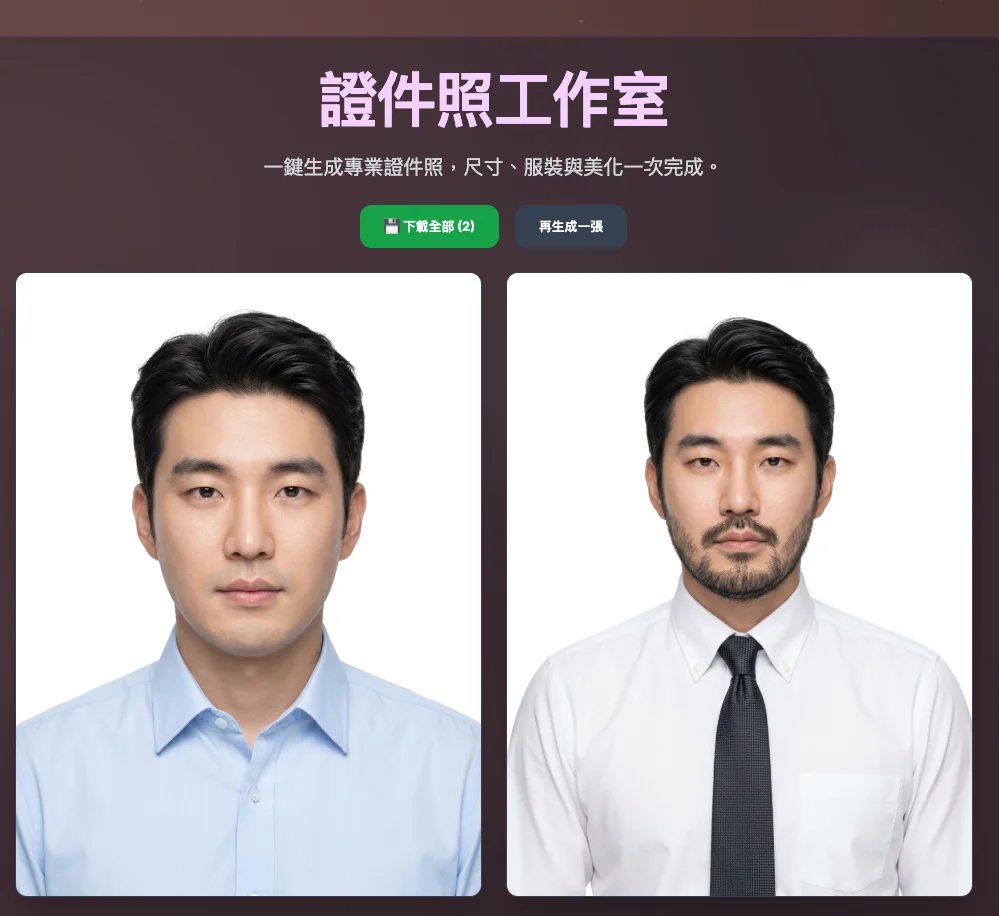
Use the field menu to specify: ID type, retouch level, background color (standard colors like white, blue, red, etc.), and clothing options (auto suit, custom photo, etc.).
2.4 Solo Everyday Photo Generation Results
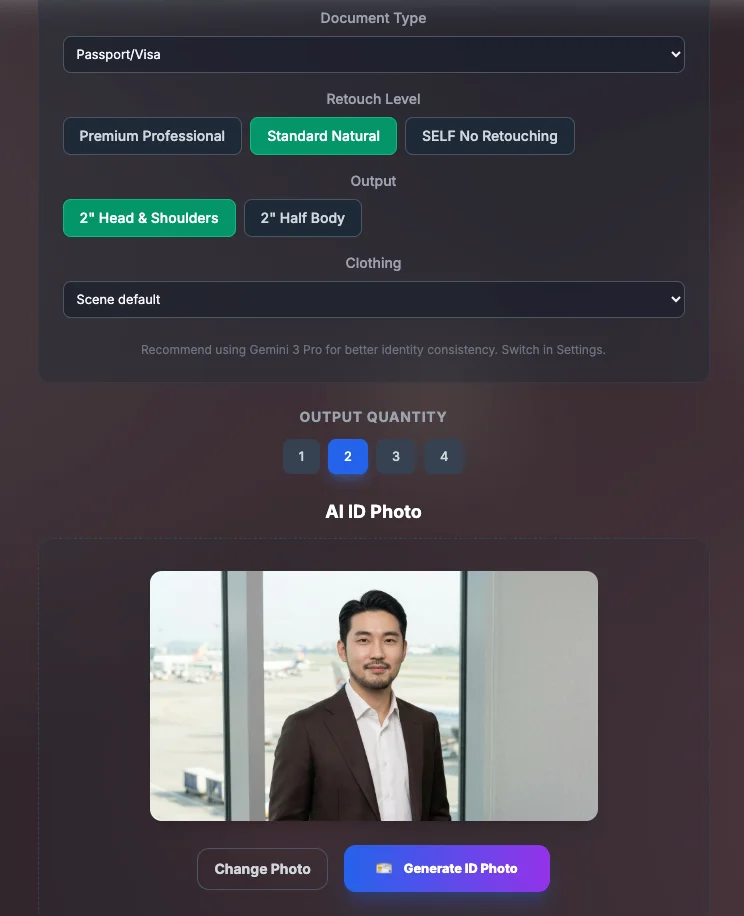
After submitting the settings, the system will generate a portrait with correct composition and clean background: The background matches the selected color (mostly white or solid color), the person is centered, and the face size and position are close to official specifications. This image can serve as the base for subsequent cropping and layout.
2.5 Complete ID Photo Layout Output
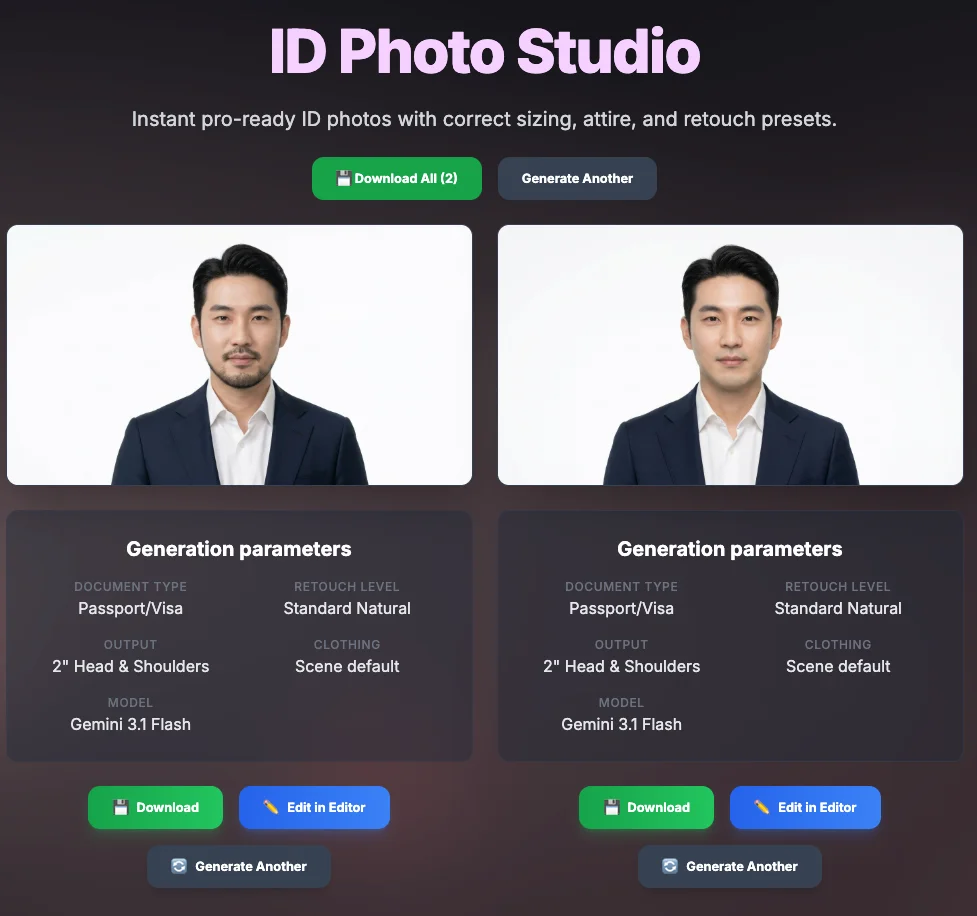
On the final result page of the ID Photo, you can see: Multiple ID photos laid out according to specifications (ready to print directly), as well as the settings used this time (type, size, retouch level, clothing, etc.). Download methods: Single download (download button below each image), or batch download using “Download All” / ZIP.
The output format can also be fine-tuned or cropped through the editor, see the Editor Steps below.
3. Editor Fine-Tuning: Final Touches
When you already have a satisfactory ID Photo or general photo, you can still enter the main editor for final tweaks.
3.1 Entering Fine-Tuning Commands in the Editor
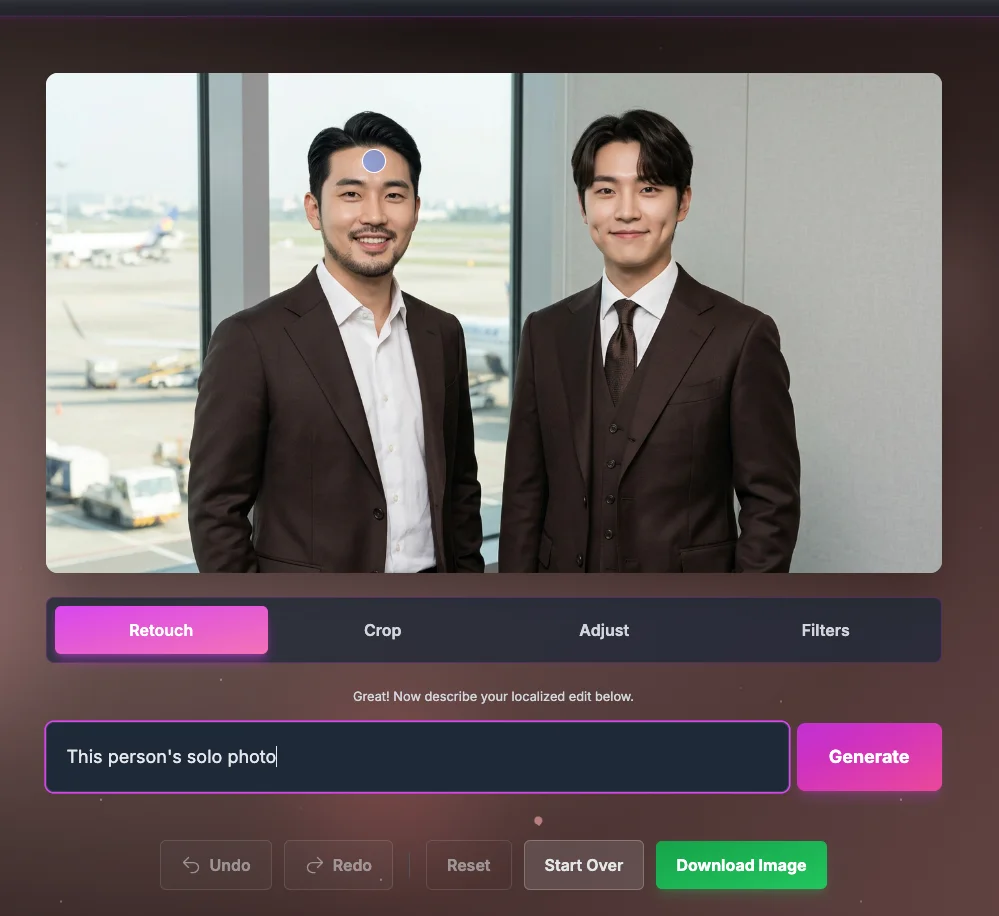
In the main editor, you can:
- Retouch: Select a certain area on the image, letting the model focus on that region for modifications, such as entering “This person’s solo photo”.
- Adjust: Enter more precise commands in the adjustment panel, such as:
- “Soften skin tone, retain facial details”
- “Slightly brighten eyes and smile, no excessive skin smoothing”
- Or use the brush/hotspot to process only specific areas.
3.2 Viewing the Fine-Tuned Results
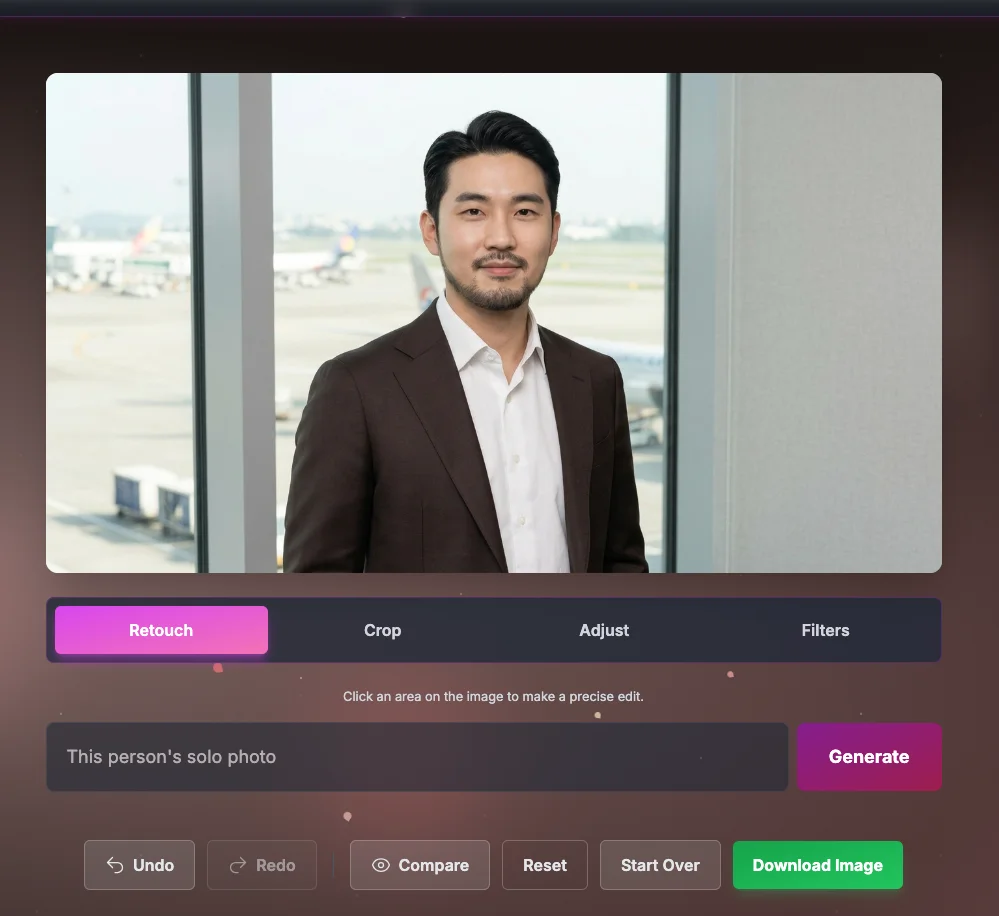
The editor will show the differences before and after retouching (you can use the “Compare Original” function). It is recommended to check: whether the facial details are natural and not overly smoothed; whether the background edges are clean, without ghosting or jaggedness.
3.3 Sending ID Photos to the Editor for Detailed Adjustments {#photo-editor}
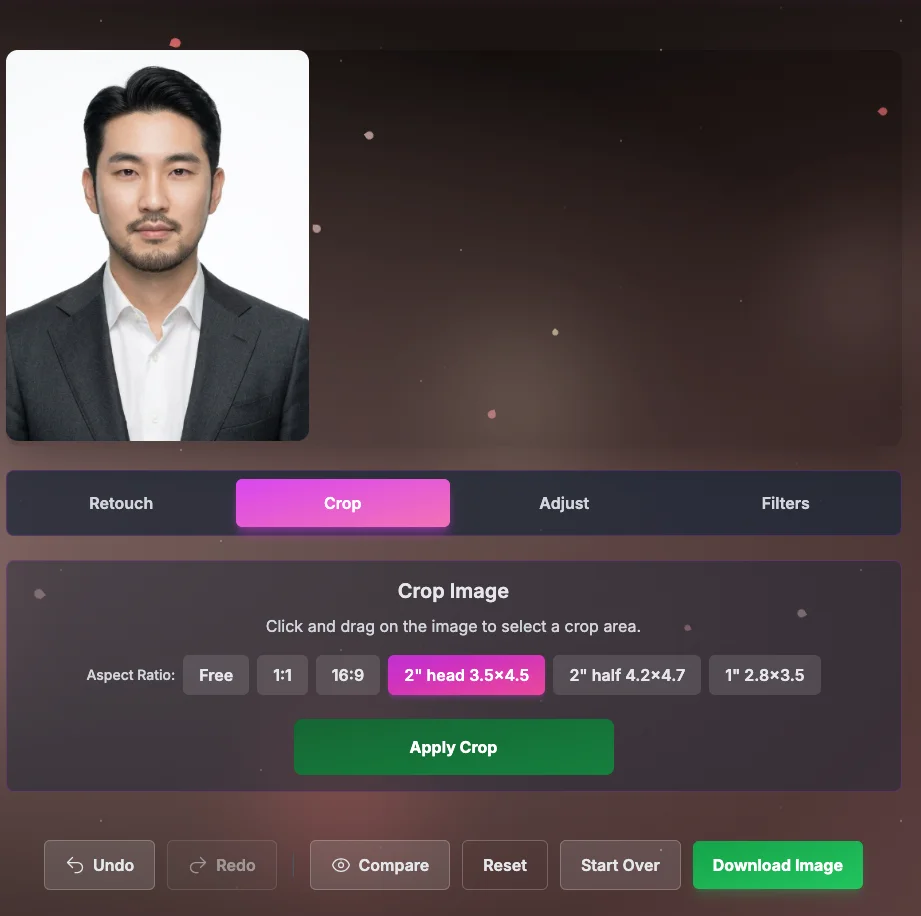
After importing the ID Photo completed in the previous section into the editor, you can: slightly adjust the brightness and contrast to make it clearer when printing, remove collar wrinkles or small blemishes, and keep the facial features and face shape unchanged to avoid violating review guidelines.
Tip: The editing of ID photos should focus on being “clear and natural,” avoiding significant changes to contours or skin tone.
4. AI Portraits: Resumes and Personal Branding Photos
4.1 Filling Out Portrait Requirements
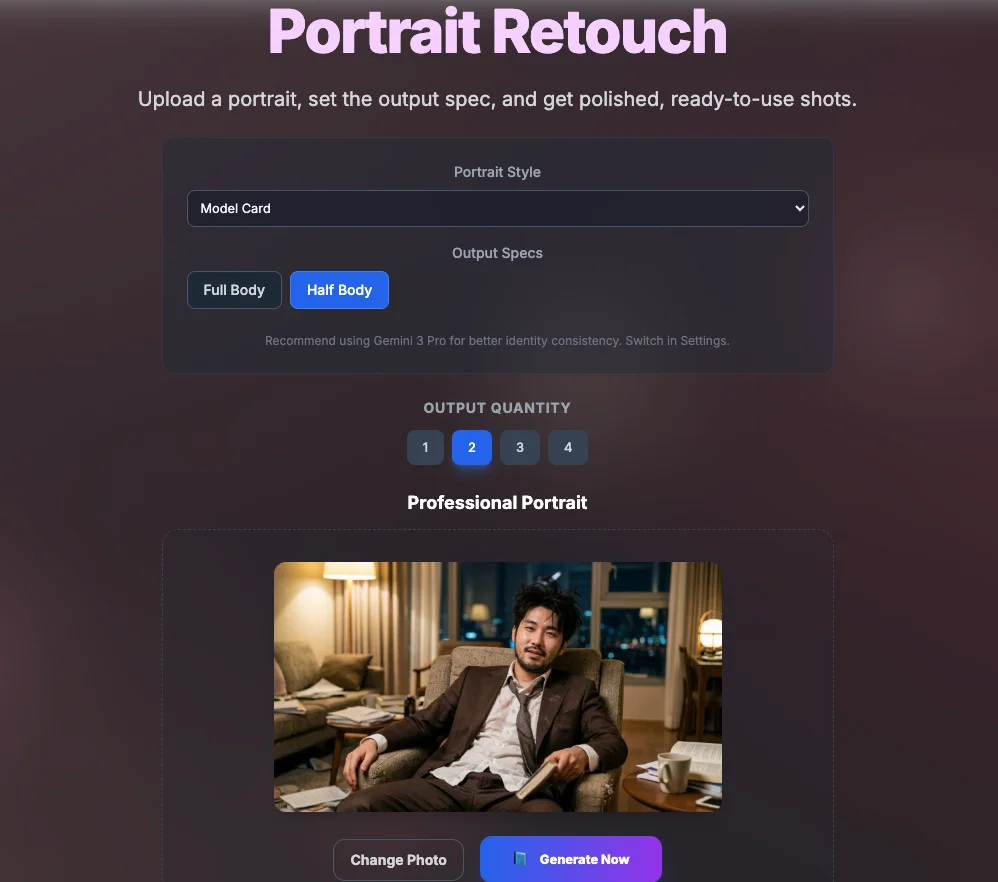
In the Portrait tab, you can: specify the purpose (resume, personal brand, social media avatar, etc.), choose the output specification (size and ratio), and optionally enter a brief supplementary description (e.g., “natural light, smile, not excessively smoothed”). It is recommended to describe it using the three elements of “purpose + atmosphere + lighting”, avoiding overly long narrative text.
4.2 Checking Half-Body Previews
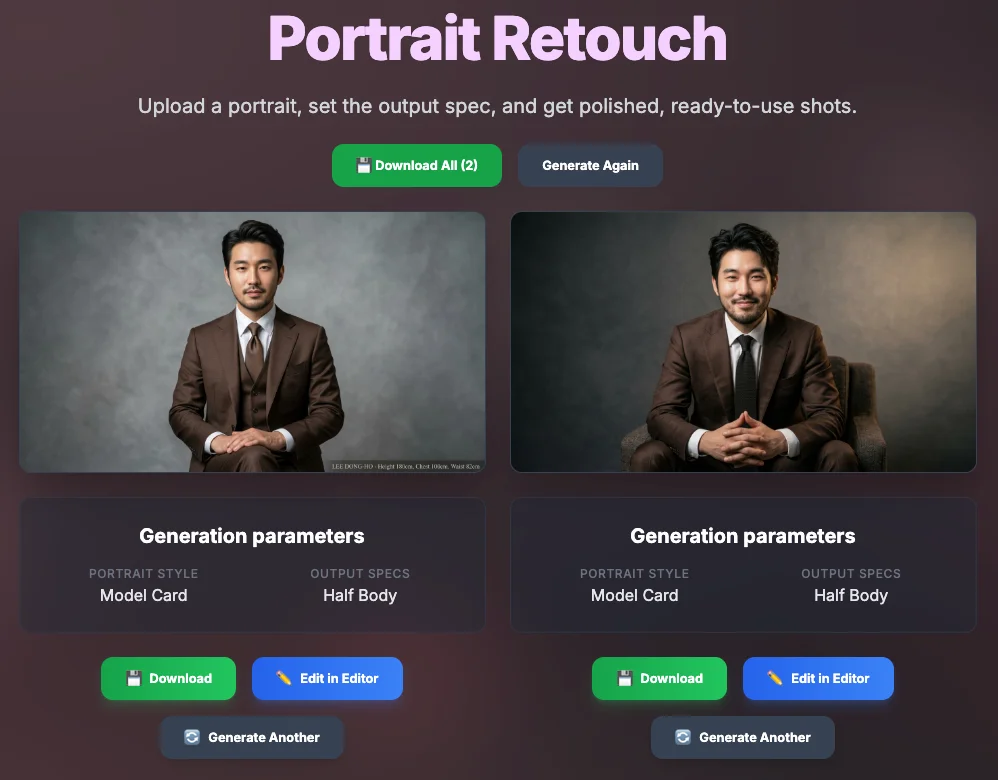
After uploading a photo, the system will display a half-body or near-half-body preview. Confirm if the face is centered and if the proportions are suitable for a resume or LinkedIn; if the composition is not ideal, you can re-upload or use the editor to crop.
4.3 Complete Portrait Results
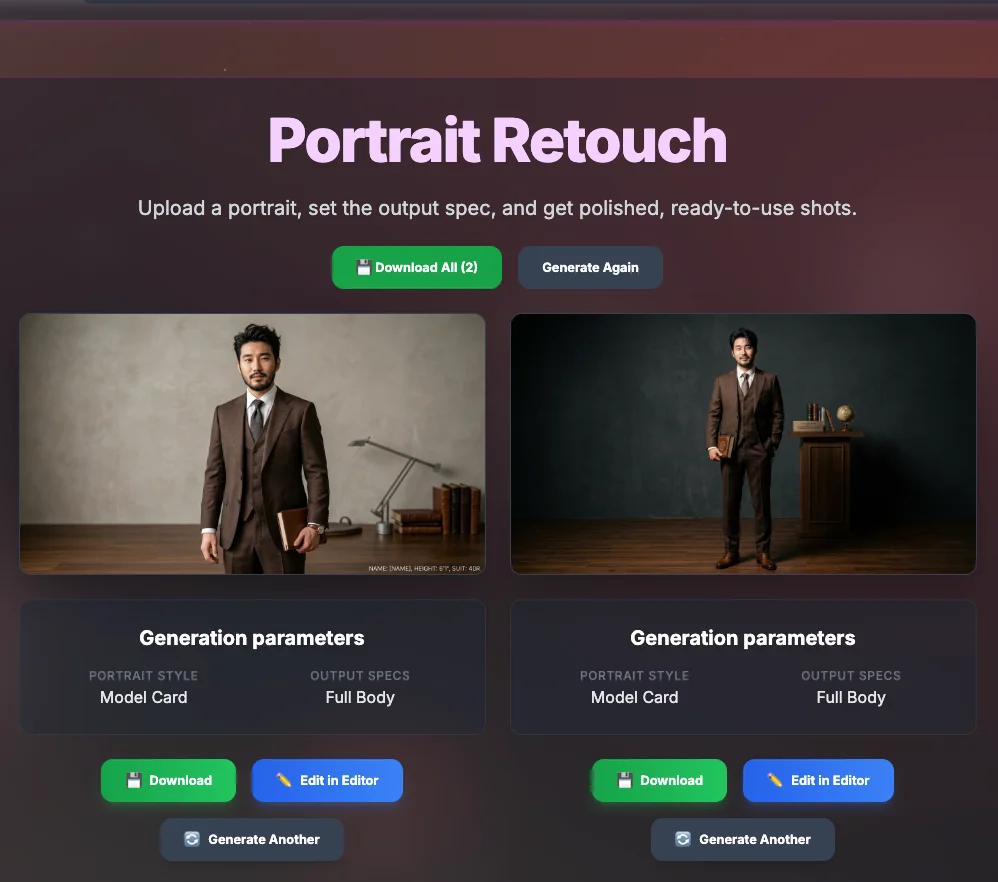
Once completed, you can see the full portrait: natural lighting, clean background, suitable for direct placement in resumes or personal websites. Below, it provides options to Download (save as PNG), Generate Again (try another set of expressions or poses under similar settings), or Send to Editor (further fine-tune skin tone, contrast, or background).
5. AI Travel Photos: World and Taiwan Scenes
5.1 Choosing Travel Subjects and Styles
You can first decide on the subject’s style (e.g., backpacker, urban traveler, couple traveling) and the overall atmosphere (realistic/postcard feel/film style). The project manual provides structured prompt examples for male and female subjects (character features, hairstyle, clothing, scene, and lighting), which can be rewritten as needed.
- Male subject example (selfie or everyday photo as input):
- Female subject example (can be paired with the form using descriptions like “Generate a female companion for the male subject”):
5.2 Setting Scenes using Maps and Forms
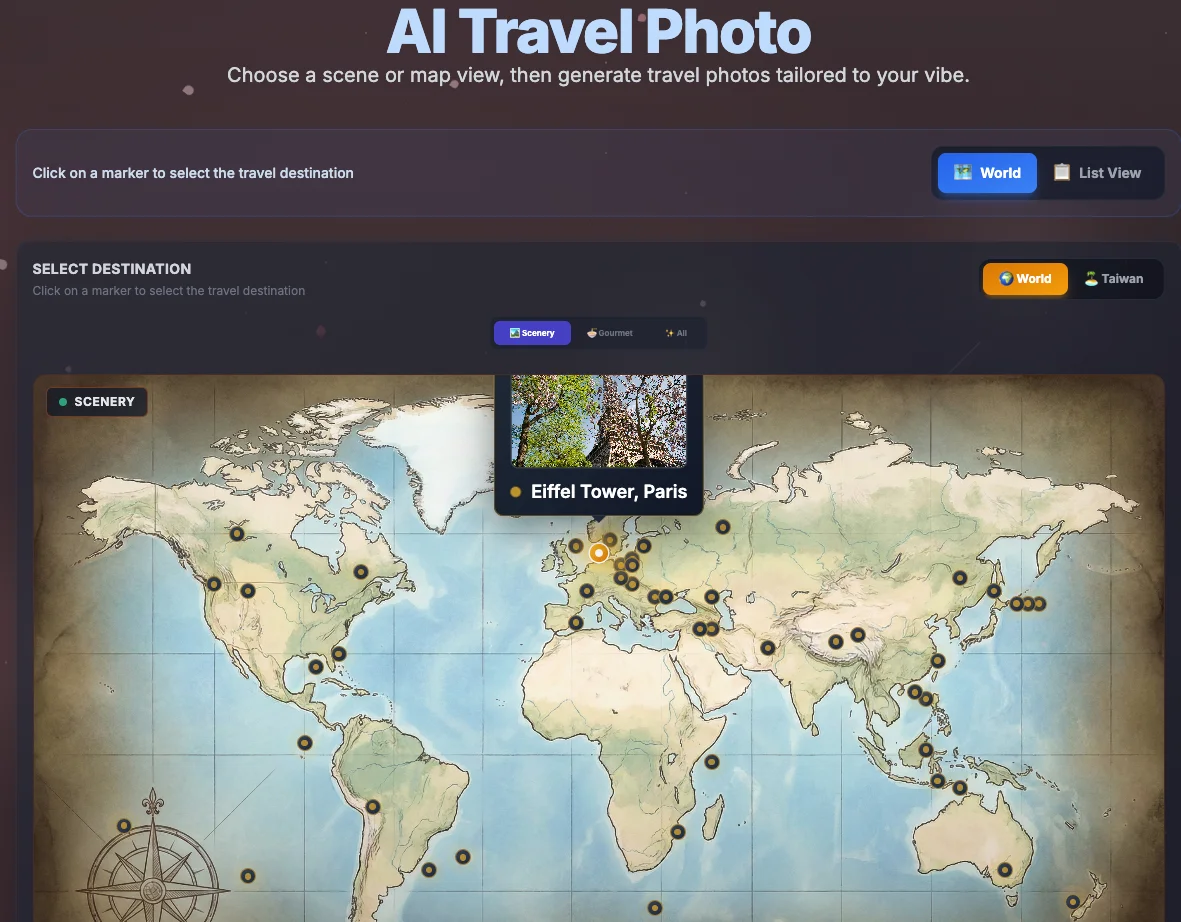
In the Travel tab: click on specific locations (cities, attractions) on the World map or Taiwan map; the TravelForm on the right allows you to set the weather (sunny, cloudy, dusk, night scene), time (day/dusk/night), clothing, pose, and composition (e.g., half-body, wide shot, person-to-scene ratio).
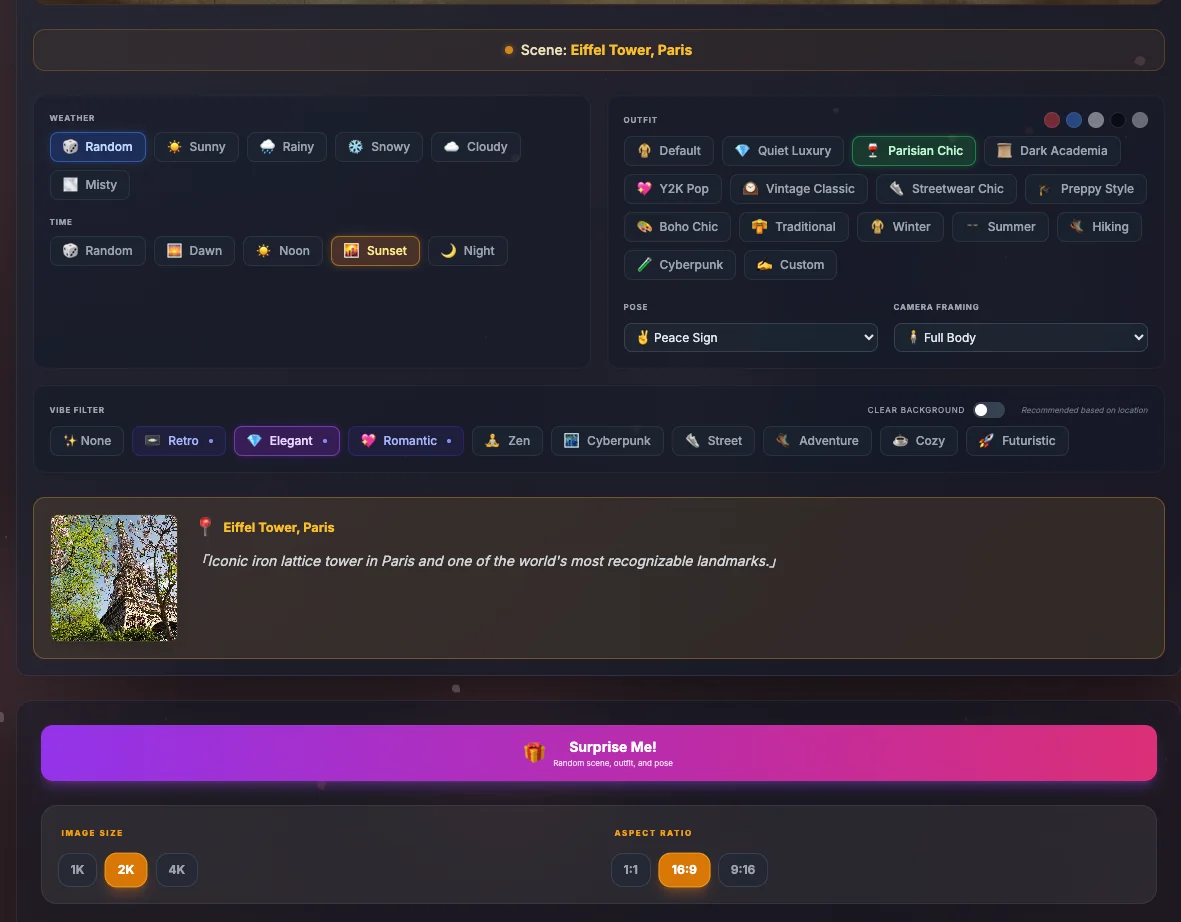
The form allows further fine-tuning of the atmosphere (relaxed, romantic, adventurous) and composition preferences (large proportion of figures, group photos, wide-angle landscapes, etc.).
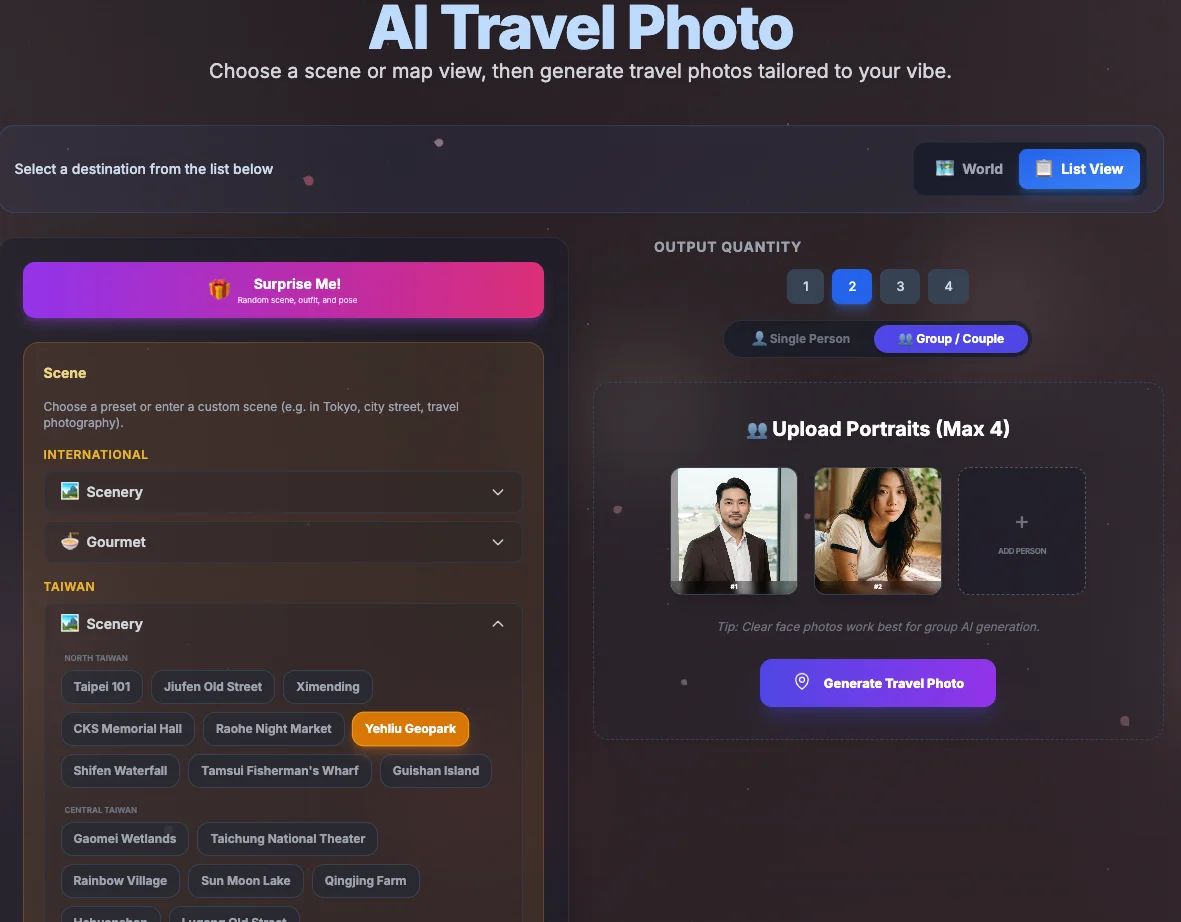
For group or couple travel photos, you can specify the number of people and their relationships (couple, friends, family), as well as whether you need a side-by-side photo, selfie perspective, or taken-by-others perspective.
5.3 Producing Solo, Couple, and Group Travel Photos
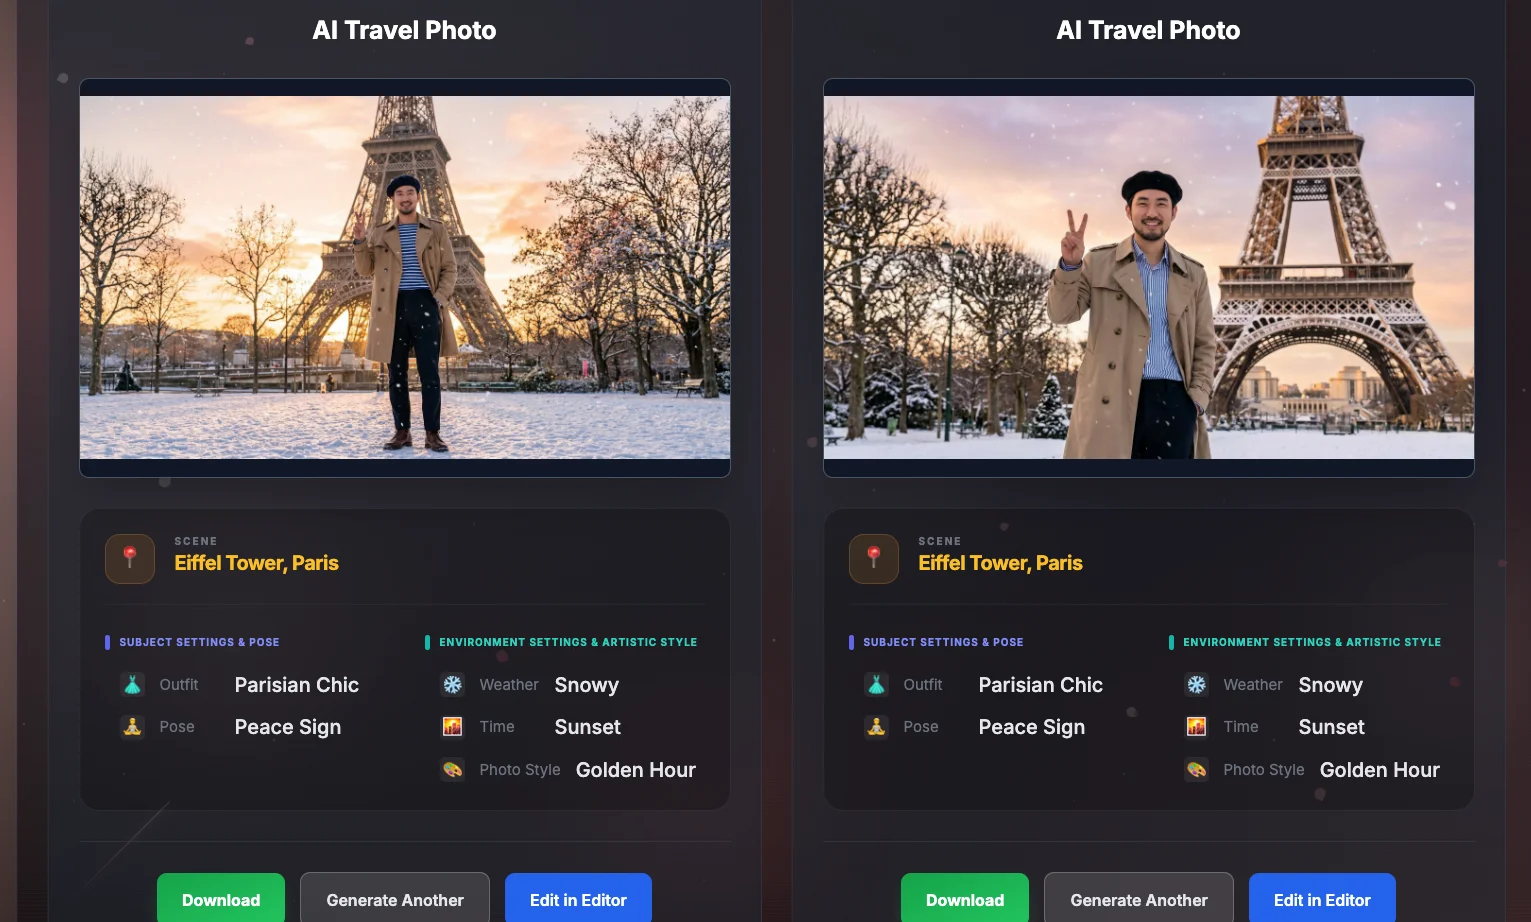
Solo travel photos focus on the proportion between the person and the background, the recognizability of the attraction, and whether the overall color and lighting match the selected weather/time.
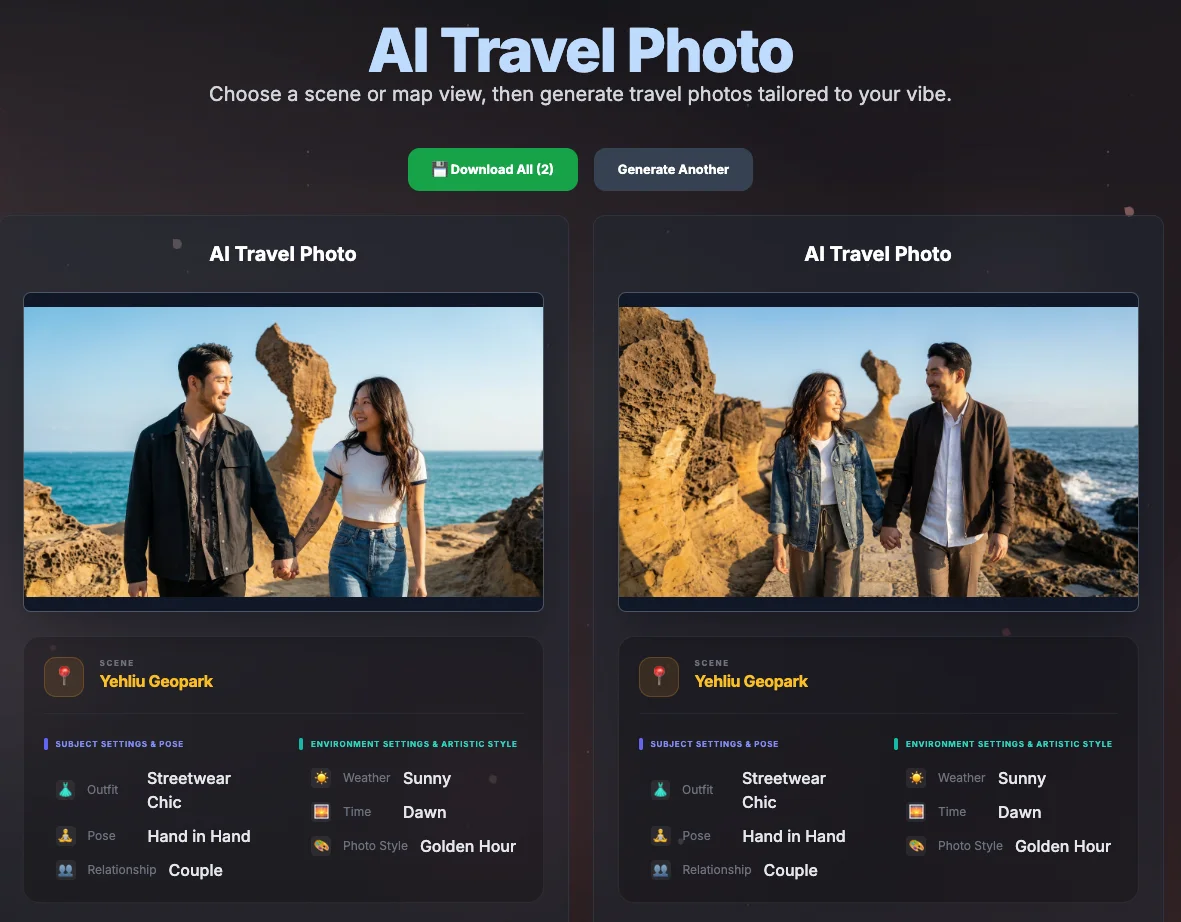
Couple or small group travel photos emphasize the sense of interaction between people (holding hands, making eye contact, looking at the scenery together) and present a romantic or lively atmosphere according to the settings. It also supports single download, batch download, regenerate, and sending to the editor.
6. AI Virtual Try-On: Character + Clothing Combinations
6.1 Uploading Characters and Multiple Outfits
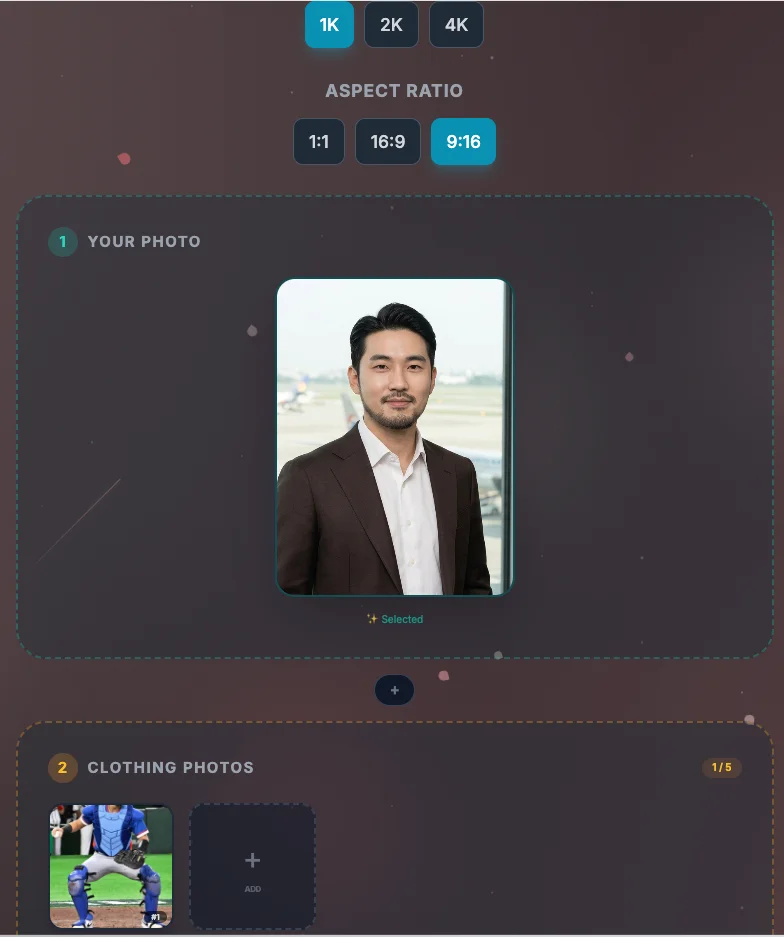
In the Try On tab: upload a clear full-body or half-body character photo on the left; upload multiple clothing images (tops, jackets, dresses, etc.) on the right. The interface will prompt the minimum/maximum number of pieces that can be uploaded and recommended size ratios. Tip: Keep the background of the character photo simple and lighting even; try to take clothing photos front-facing and flattened for the model to easily recognize.
6.2 Browsing Try-On Results and Exporting
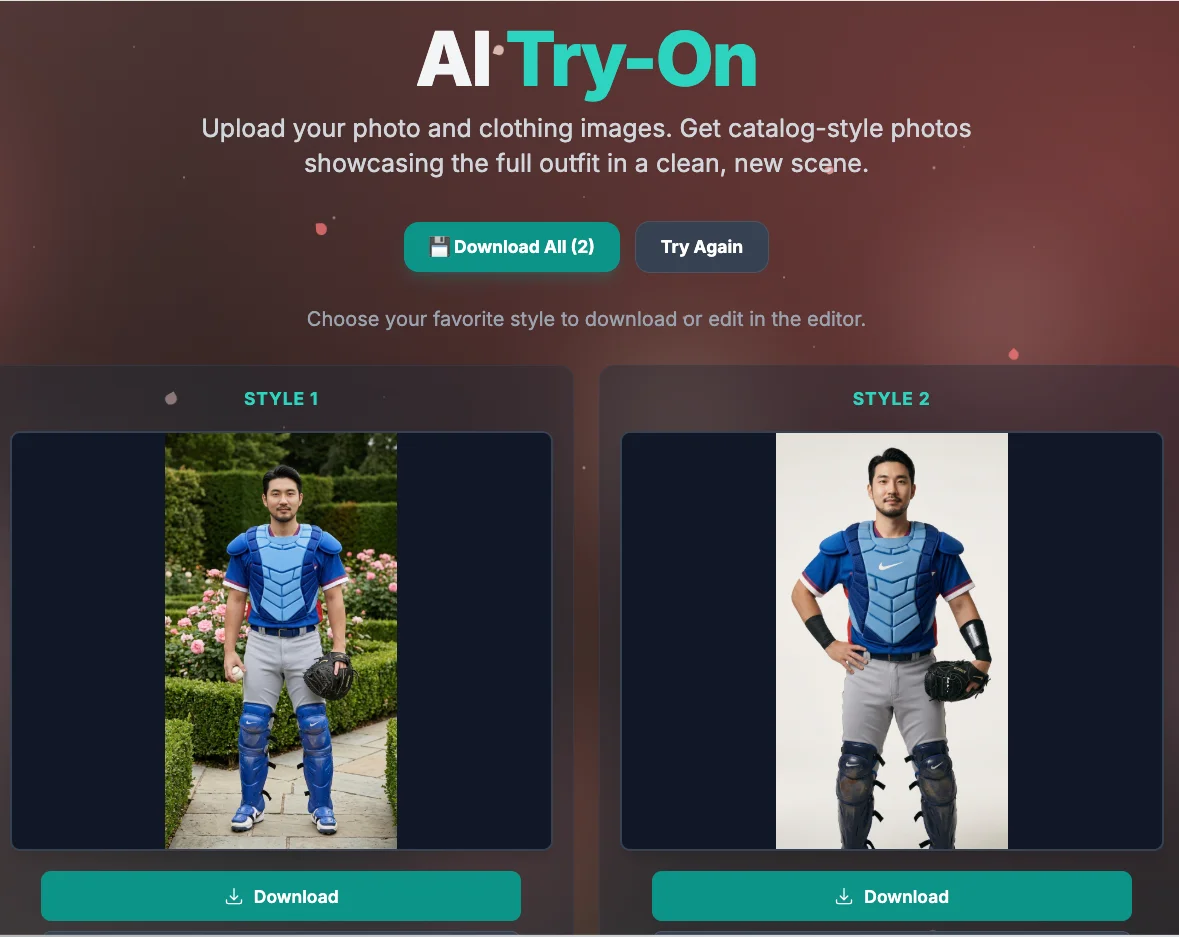
Once generation is complete, the Try On page will display different clothing combinations in a card list. Each card represents a set of try-on results and may include clothing names or style tags, a download button, and an import to editor button. It is recommended to quickly browse all cards first, pick a few that best match the actual outfit feel, and then send the results requiring detailed tweaks to the editor for background or lighting fine-tuning.
6.3 Female Demonstration: From Solo Photo to Multiple Styles
Uploading Characters and Clothing
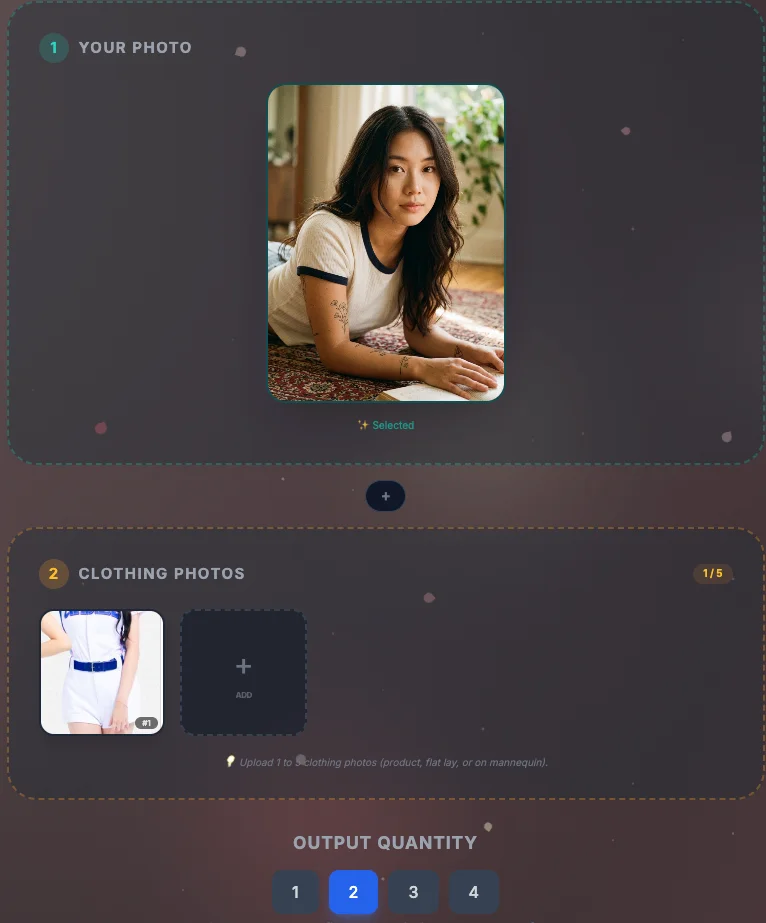
In the example: YOUR PHOTO is a solo photo (e.g., lying on a rug), serving as the try-on base; CLOTHING PHOTOS allows multiple pieces of clothing to be uploaded (the interface shows something like 1/5). Below, OUTPUT QUANTITY allows you to choose the number of try-on results to output at once (1 to 4 images).
Producing Multiple Try-On Results
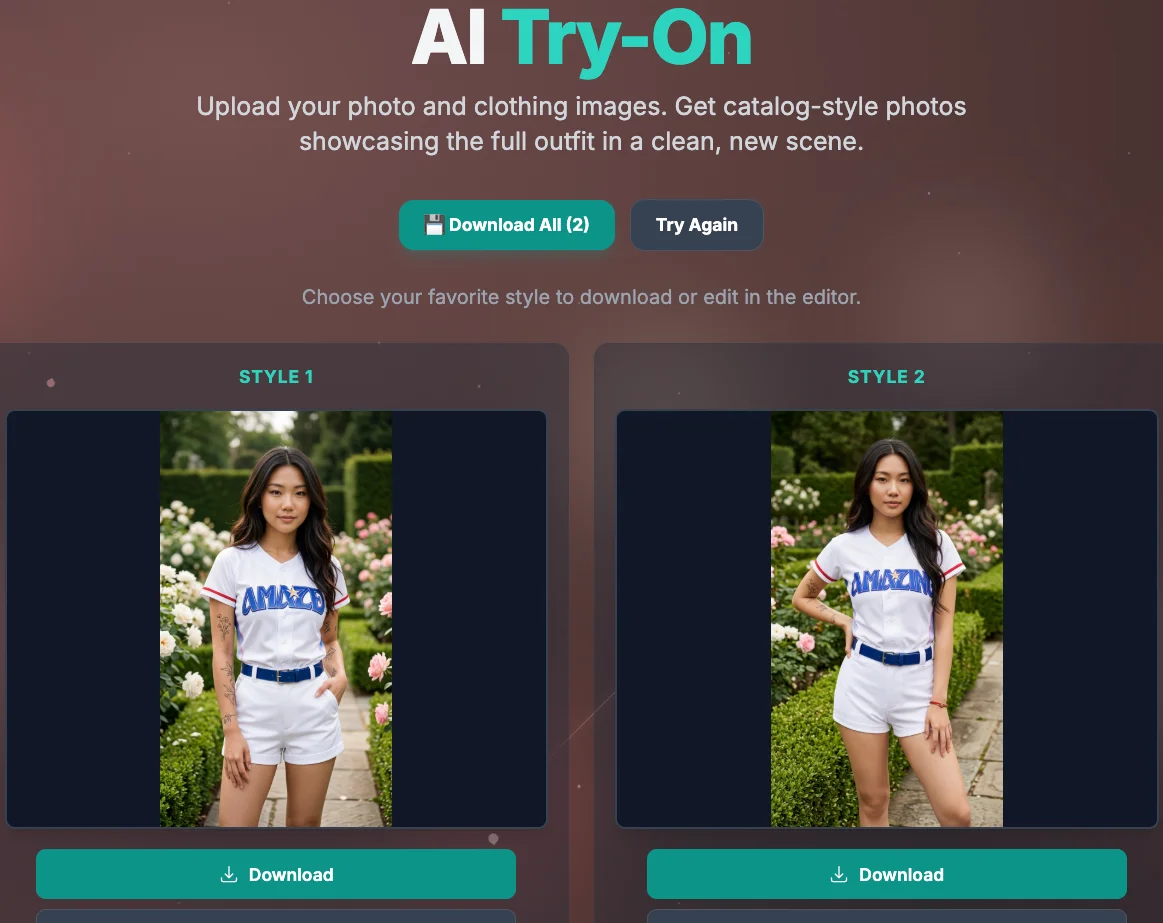
After generation, the screen will show an AI Try-On title and multiple style cards. At the top, there are Download All and Try Again buttons; each card is labeled STYLE 1, STYLE 2… and paired with corresponding clothing and scenes. You can download them individually below the card. Recommended workflow: Use a small amount of clothing to test first. After confirming that the blending of character and clothing is natural, batch upload more clothing and increase the output quantity.
7. Recommended Learning Path
- Start practicing prompts in Generate — Learn to use brief descriptions to control style and composition.
- Then move to structured forms like ID Photo / Portrait / Travel / Try On — Familiarize yourself with how each field affects the results.
- Finally, use the editor to fine-tune details — Utilize retouching, filters, and cropping to create the final product.
For more feature descriptions and project technical details, please see the BloomRender Project Page; for the complete illustrated manual and JSON prompt examples, refer to the BloomRender User Manual on GitHub.
Related engineering notes
- Industry Pulse Google Cloud × CyberLink: Product Decisions for Generative Multimedia AI A source-checked reading of CyberLink's multimedia AI work: what the Google Cloud case study supports and what product teams still need to validate.

- Industry Pulse What Is Meta Muse Image? Agentic Generation, Availability, and Limits A source-backed analysis of Muse Image's search, coding tools, self-refinement, and test-time compute, with its product availability, evidence, and adoption limits.

- Industry Pulse Nano Banana 2 Lite and Gemini Omni Flash: Official Specs, Preview Limits, and Adoption Checks A grounded review of Google's published specs, pricing, and preview limitations for Nano Banana 2 Lite and Gemini Omni Flash, plus what to validate before adopting an image-to-video pipeline.